cPanel
Note
- cPanel is auto-installed only if you select the add-on at the time of purchasing the server. If you have added it later, you will have to install it manually.
- It is recommended to install cPanel on a fresh server to avoid any misconfigurations. You can choose to Rebuild the server, in case you have made any customisations. As rebuild completely wipes off the server data, ensure that you have taken a back up before performing this action.
- It is strongly recommended that you run this installation via "screen" mode to avoid any interruptions during this 45-60 minute background process.
You can install cPanel with this simple one-step process in case you have bought it separately.
Login via SSH to your server and run the following command:
# cd /home && curl -o latest -L https://securedownloads.cpanel.net/latest && sh latest
To confirm successful installation of cPanel, you can run the below command. The output of the completed installation will be as shown in the image.
# tail /var/log/cpanel-install.log

For more details, refer to cPanel’s installation guide.
Plesk
Note
- Plesk is auto-installed only if you select the add-on option at the time of purchase. You will have to install it manually if the add-on is added later.
- It is recommended to install Plesk on a fresh server to avoid any misconfigurations. You can choose to Rebuild the server, in case you have made any customisations. As rebuild completely wipes off the server data, ensure that you have taken a back up before performing this action.
- It is strongly recommended that you run this installation via "screen" mode to avoid any interruptions during this 15 to 20 minutes while the process runs in the background.
Install Plesk with this simple one-step process.
- Login via SSH to your server and run the following command:
# sh <(curl https://autoinstall.plesk.com/one-click-installer || wget -O - https://autoinstall.plesk.com/one-click-installer) - Once the installation is complete, you will see the following message. You can log in to the Plesk interface by using the IP-based URL.
This server is powered by Plesk. Log in by browsing https://1.1.1.1:8443 or https://1-1-1-1.webhostbox.net:8443/ You can log in as user 'root' or 'admin'. To log in as 'admin', use the plesk login command. Use the plesk command to manage the server. Run plesk help for more info. - From the control panel, go to the VPS Hosting order you have purchased and click Admin Details. Copy the license key. This will be required when you log in to your Plesk account for the first time.

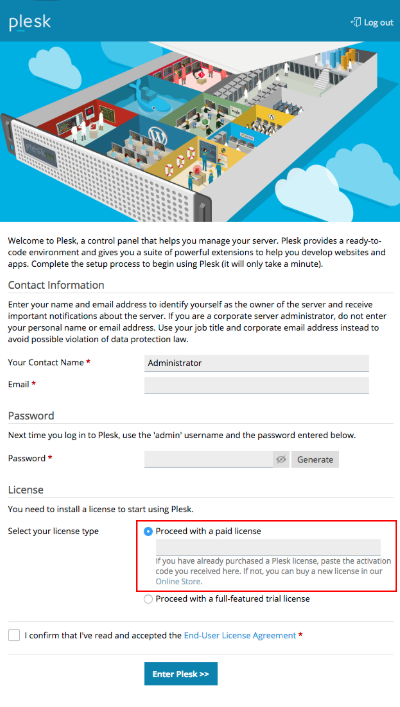
- Log in to the Plesk Account as mentioned in Step 2. Fill in the details in the form. Under the License section, select the Proceed with a paid license option and paste the license key.

- Click the checkbox to accept the terms and conditions and then click Enter Plesk to complete the installation of Plesk add-on for your VPS order.
For more details, refer to Plesk’s installation guide.